The HPBX Auto Attendant is a system that gives you the capability to set up call flows to help your callers reach the people or information they require quickly and easily. These call flows use a combination of a weekly schedule, menu recordings, hunt groups, and bulletins, to accomplish the most efficient call flow for your business, 24 hours per day.
To use this tutorial, simply click on the topic to the left to learn more about it. To take full advantage of the HPBX Auto Attendant you will want to be, at the very least, familiar with:
Menus
Bulletins
Upload Greetings
Hunt Groups
Weekly Schedule
Note: Before proceeding to learn about the various HPBX Auto Attendant topics, it may be helpful to first plan out the call flow setup you wish to have:
When a caller first dials your number, should a phone(s) ring or a recording play?
What phones ring?
Are their key press options on the recording?
What happens if the phone or phones ring and nobody answers? Should other phones ring or should a specific voicemail take the call?
Hosted PBX Auto Attendant
What is the Hosted PBX (HPBX) Auto Attendant?
The HPBX Auto Attendant is a system that gives you the capability to set up call flows to help your callers reach the people or information they require quickly and easily. These call flows use a combination of a weekly schedule, menu recordings, hunt groups, and bulletins, to accomplish the most efficient call flow for your business, 24 hours per day.
To use this tutorial, simply click on the topic to the left to learn more about it. To take full advantage of the HPBX Auto Attendant you will want to be, at the very least, familiar with:
Menus
Bulletins
Upload Greetings
Hunt Groups
Weekly Schedule
Note: Before proceeding to learn about the various HPBX Auto Attendant topics, it may be helpful to first plan out the call flow setup you wish to have:
When a caller first dials your number, should a phone(s) ring or a recording play?
What phones ring?
Are their key press options on the recording?
What happens if the phone or phones ring and nobody answers? Should other phones ring or should a specific voicemail take the call?
Logging into your HPBX Auto Attendant
To configure your auto attendant, the first thing you'll need to do is login to it's configuration page. This can be done by either accessing it via the HostPilot Admin Portal or accessing it via Voice Services for non-administrators.
Auto Attendant Access via the HostPilot Admin Portal
[click to expand]
First, you'll need to access the HostPilot Admin Portal login site. This login generally uses your email address or in rare cases an alphabetic username. The password will be alphanumeric.
Once logged in, you'll access your HPBX Auto Attendant configuration page by:
Going to 'Users & Services'
Then select 'Voice Services'
Next click on 'Numbers & Extensions'
Now click on the corresponding phone number of your auto attendant to configure it
Auto Attendant Access via Voice Services:
[click to expand]
For those who do not have administrator access but do have the PIN number for the HPBX Auto Attendant, you'll need to access the Voice Services Login Portal. This login uses the auto attendant phone number using no characters or spaces (8773570750) for the username. The password is a 6-10 digit numeric PIN.
Once logged in, you'll be ready to configure your HPBX Auto Attendant.
Note: If you do not know the PIN, then you will need to contact your account administrator. The account administrator can provide this or reset it in the HostPilot Admin Portal.
Menus
Menus are the start of your call flow and contain the following configurations:
What phones ring initially when someone calls in.
The main company recording.
Menu key press options.
The steps below will guide you through setting up a menu from start to finish.
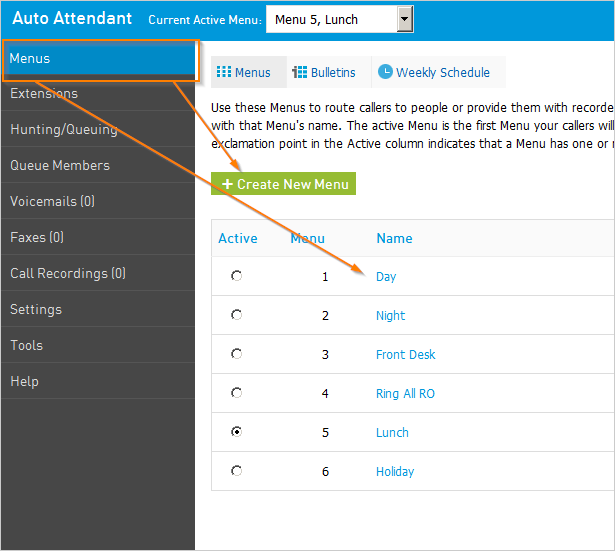
Step 1: Accessing Menu Settings
[click to expand]
Accessing Menu Settings
To access the menu's configuration:
Click on the "Menus" tabe at the top-left.
Then, click the name of the menu you want to configure(i.e. "Day" or "Night").
If you need to create a new menu, then click the green "+ Create New Menu" button at the top of the menu name list.
Once you've selected the menu you wish to edit or created a new menu, continue with the tutorial.
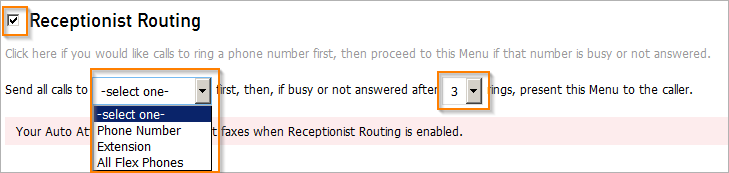
Step 2:Receptionist Routing
[click to expand]
Receptionist Routing
This is where the call flow starts. If you want a phone or multiple phones to ring before any sort of custom recording or voicemail recording is played then click the Receptionist Routing checkbox to enable it. Once enabled, the first drop-down allows you to "Send all calls to" the following options:
Phone Number information
[click to expand]
Phone Number: One number that is not on your Intermedia account such as a cell phone or answering service. Selecting 'phone number' will prompt you to enter a phoen number, do not use hyphens or spaces (i.e. 8773570750)
Extension information
[click to expand]
Extension: One number that is on the account.
-Selecting this will prompt you to choose an extension from your Intermedia account which can include extensions assigned to the phones or virtual extensions created in the Auto Attendant (see the 'Extensions' tab to the left for more information on virtual extensions).
All Flex Phones information
[click to expand]
All Flex Phones: This will choose all extensions on your Intermedia acccount including extensions created within the Auto Attendant (click here for more information on creating extensions).
Now, you will choose the number of rings you want your phone number, extension, or all phones to ring. Select 3 through 9 rings from the "if busy or not answered" drop-down box.
When using the 'Phone Number' option to ring to a cell phone or off-network phone, the number of rings needs to be lower than the number of rings it takes that cell phone or off-network phone to take the call to voicemail. For example, if your cell phone takes all calls to voicemail after 6 rings, then receptionist routing should be set to 5 or less rings.
Note: If you want a select group of phones to ring before any custom recording or voicemail instead of all phones or just one phone, click here.
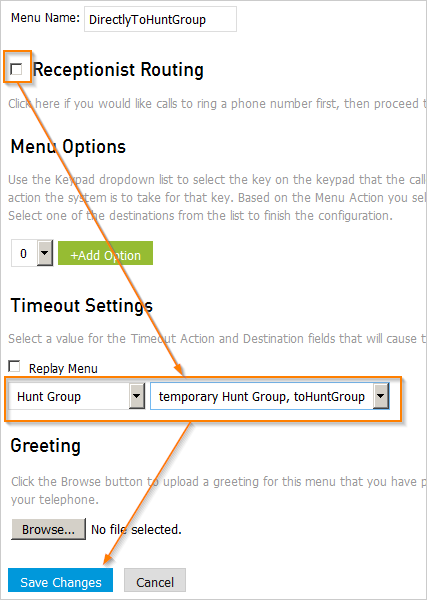
To have a call flow immediately ring a select group of phones (not all phones and not just one phone), do the following:
On your main active menu, disable receptionist routing.
Ignore the menu options section.
Timeout the main active menu to a hunt group.
Save your menu and then configure your hunt group.
If you need a custom menu recording to play after the hunt group, time the hunt group out to a brand new menu where you will have the menu recording and key press options if needed.
Step 3: Menu Options
[click to expand]
Menu Options
If the phone was not answered by the phones selected in Receptionist Routing or you have it disabled then the call flow will move on to the Menu Options section.
This section is where your custom menu greeting will play. The Menu Options section is used only if your custom recording tells the caller that by pressing a certain key, something will happen. If you do not wish to have key presses configured, then you can move on to "Step 4: Timeout Settings".
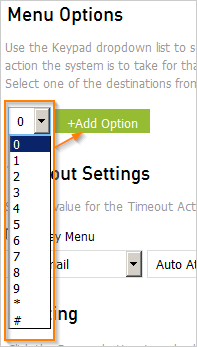
If you are going to have key presses:
Choose a key press that the call will use then click the green "+Add Option" button.
With the key press added, you'll now choose the "-select one-" drop-down box to define what that key press does when a caller dials that key. Try it below to get more information on each key press option:
One number that is not on your Intermedia account such as a cell phone or answering service.
Selecting this will prompt you to enter a phone number, do not use hyphens or spaces (i.e. 8773570750).
One number that is on the account.
Selecting this will prompt you to choose an extension from your Intermedia account which can include extensions assigned to the phones or virtual extensions created in the Auto Attendant (see the 'Extensions' tab to the left for more information on virtual extensions)
Link to an already created menu or create a new menu. Then follow this tutorial to set up the linked menu. This option is commonly used if you have multiple departments that will require their own custom recording with separate key press options.
Bulletins hold a custom recording and can be used for informational purposes or for custom voicemail recordings. Bulletins used for key presses are commonly used for recordings giving hours, directions, or other commonly requested business information. Bulletins can also be used for custom voicemail recordings. For more information on bulletins, select the 'Bulletins' tab to the left.
Hunt Groups are a group of phones that ring in an ordered manner or all at the same time. This options is commonly used when there is a group of phones assigned to a specific department such as for setting an appointment or reaching the sales department. For more information on Hunt Groups, click the 'Hunt Groups' tab to the left.
Call Queues are advanced versions of hunt groups. Call Queues are commonly used in settings with high call volume where there will consistently be active calls. Using a call queue places the caller on hold from 1 minute up to 60 minutes until a phone becomes available. For much more detailed information on Call Queues and setting them up, click the 'Call Queues' link to the left.
This option will send calls straight to the voicemail on one of your Intermedia phones, the Auto Attendant voicemail, or a voicemail bulletin.
After the caller presses the assigned key, an automated recording (not configurable) will state "Please enter the extension number of the person you are calling followed by #". Please review the 'Extensions' tab to the left to find out more on enabling/disabling specific extensions that will be allowed in the Dial by Extension option.
Note: Dial by Extension can only be activated by a key press. Having a menu recording stating something along the lines of "If you know your party's extension please dial it now" will NOT work. The menu recording must state a specific key to be pressed to activate the dial by extension option.
After the caller presses the assigned key, an automated recording (not configurable) will state "Please enter the first few letters of the party's name followed by #. For 'Q' touch 7 for 'Z' touch 9". Please review the 'Extensions' tab to the left to find out more on enabling/disabling specific extensions that will be allowed in the Dial by First Name option.
After the caller presses the assigned key, an automated recording (not configurable) will state "Please enter the first few letters of the party's last followed by #. For 'Q' touch 7 for 'Z' touch 9". Please review the 'Extensions' tab to the left to find out more on enabling/disabling specific extensions that will be allowed in the Dial by Last Name option.
This will replay the menu recording. This is commonly used for longer recordings that use many key press options.
This will immediately disconnect the caller.
Step 4: Timeout Settings
[click to expand]
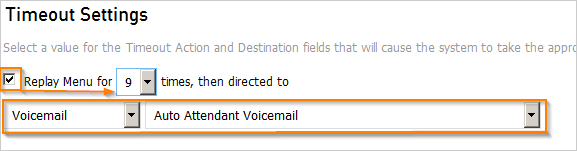
Timeout Settings
This is where the call will end up if there was no custom menu recording, a custom menu recording with no key presses, or the caller didn't press anything during the menu recording.
The 'Replay Menu' check box allows you to choose to have the custom menu recording replay up to 9 times.
If the caller continues to not press anything during the replayed recording or if you did not enable that option then the call will timeout to the option you choose in the "Timeout Settings" drop-down box. These options are exactly the same as for the menu key press options, review them above in the "Menu Options" section if needed.
One number that is not on your Intermedia account such as a cell phone or answering service.
Selecting this will prompt you to enter a phone number, do not use hyphens or spaces (i.e. 8773570750).
One number that is on the account.
Selecting this will prompt you to choose an extension from your Intermedia account which can include extensions assigned to the phones or virtual extensions created in the Auto Attendant (see the 'Extensions' tab to the left for more information on virtual extensions)
Link to an already created menu or create a new menu. Then follow this tutorial to set up the linked menu. This option is commonly used if you have multiple departments that will require their own custom recording with separate key press options.
Bulletins hold a custom recording and can be used for informational purposes or for custom voicemail recordings. Bulletins used for key presses are commonly used for recordings giving hours, directions, or other commonly requested business information. Bulletins can also be used for custom voicemail recordings. For more information on bulletins, select the 'Bulletins' tab to the left.
Hunt Groups are a group of phones that ring in an ordered manner or all at the same time. This options is commonly used when there is a group of phones assigned to a specific department such as for setting an appointment or reaching the sales department. For more information on Hunt Groups, click the 'Hunt Groups' tab to the left.
Call Queues are advanced versions of hunt groups. Call Queues are commonly used in settings with high call volume where there will consistently be active calls. Using a call queue places the caller on hold from 1 minute up to 60 minutes until a phone becomes available. For much more detailed information on Call Queues and setting them up, click the 'Call Queues' link to the left.
This option will send calls straight to the voicemail on one of your Intermedia phones, the Auto Attendant voicemail, or a voicemail bulletin.
After the caller presses the assigned key, an automated recording (not configurable) will state "Please enter the extension number of the person you are calling followed by #". Please review the 'Extensions' tab to the left to find out more on enabling/disabling specific extensions that will be allowed in the Dial by Extension option.
Note: Dial by Extension can only be activated by a key press. Having a menu recording stating something along the lines of "If you know your party's extension please dial it now" will NOT work. The menu recording must state a specific key to be pressed to activate the dial by extension option.
After the caller presses the assigned key, an automated recording (not configurable) will state "Please enter the first few letters of the party's name followed by #. For 'Q' touch 7 for 'Z' touch 9". Please review the 'Extensions' tab to the left to find out more on enabling/disabling specific extensions that will be allowed in the Dial by First Name option.
After the caller presses the assigned key, an automated recording (not configurable) will state "Please enter the first few letters of the party's last followed by #. For 'Q' touch 7 for 'Z' touch 9". Please review the 'Extensions' tab to the left to find out more on enabling/disabling specific extensions that will be allowed in the Dial by Last Name option.
This will replay the menu recording. This is commonly used for longer recordings that use many key press options.
This will immediately disconnect the caller.
Step 5: Greeting
[click to expand]
Greeting
This section is where you can upload a custom menu recording that was recorded to a sound file. The file type can be .wav or .mp3. To upload a greeting:
Click the "Browse..." button.
Locate the file on your computer.
Highlight the file and click "Open".
The file will then upload. After clicking "Save Changes" at the bottom of the page, your greeting will be successfully uploaded to this particular menu"
Note: Uploading a sound file is not the only method to create a menu greeting. For full information on creating menu recordings click the tab to the left labeled: "Recording Greetings".
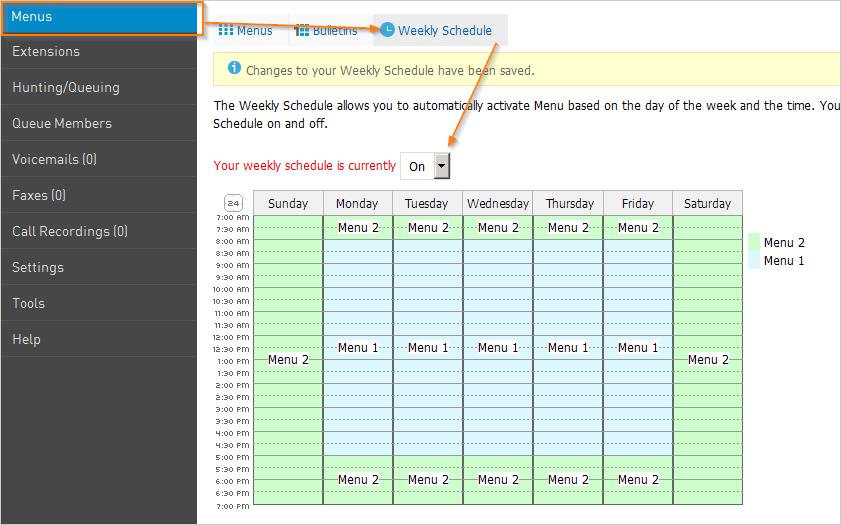
Weekly Schedule Setup
The weekly schedule is used to determine what menu will be active based on what day the caller is calling in on and what the time is of that call.
Before configuring your weekly schedule, be sure to have all your menu's configured first.
Step 1: Toggle the Weekly Schedule
[click to expand]
If you plan on having the same call flow 24 hours a day and seven days a week OR you would prefer to manually adjust the active menu (for example if your schedule varies each day or week) then you will want to disable the weekly schedule. To toggle the weekly schedule on and off, do the following:
Click the "Menus" tab.
Then click the "Weekly Schedule" tab.
Next, toggle between 'On' and 'Off' in the 'Your weekly schedule is currently' section.
Step 2: Calendar View
[click to expand]
The next part of the tutorial is the weekly schedule calendar. This will give you a visualization of the current schedule and what menus are active depending on the time and day of the week.
Note: At this time, you cannot schedule a different call flow outside of the current week. Click here for more information.
Wait until the week of the holiday that the menu is for and then add it to the weekly schedule. This method will require you to revert the changes after the holiday is over to go back to your regular weekly schedule.
On the day or eve of the holiday, turn off the weekly schedule. You can then go to the menus section of your auto attendant and manually activate the holiday menu. This method requires that you to revert these changes after the holiday is over, otherwise the holiday menu will continue to play until manually changed.
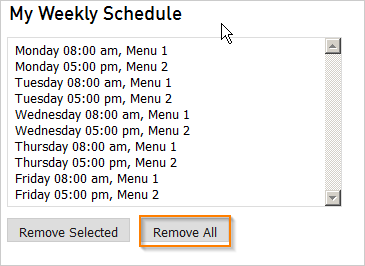
Step 3: Modifying the Weekly Schedule
[click to expand]
To modify the weekly schedule, you'll use the "Create/Modify Weekly Schedule Events" section under the calendar.
First, make a note of each of your menus and the days and times that it will first become active.
Next, Clear out the "My Weekly Schedule" section at the bottom-right by clicking the "Remove All" button or highlighting the first entry and then holding your 'Ctrl' key and clicking on the each entry you want removed. Then, with the selected entries highlighted, click the "Remove Selected" button.
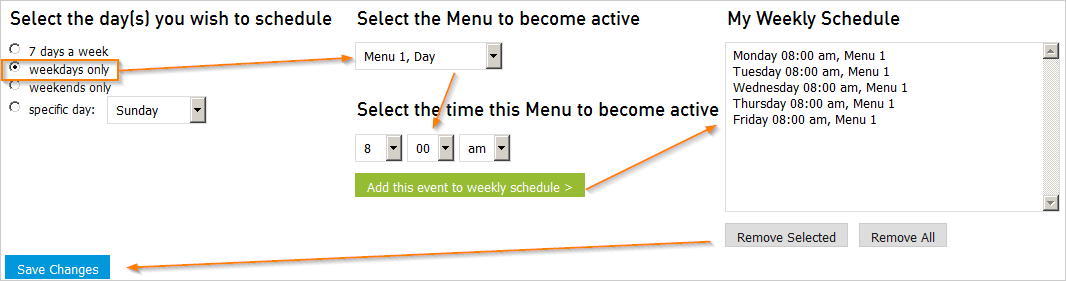
Now, "Select the day(s) you wish to schedule" for the first menu that you want to add to the schedule:
Note: Click here if you are unsure what option to choose.
Will this menu become active the same time Sun-Sat? If yes, choose "7 days a week".
Will this menu become active only on Monday through Friday? If yes, choose "weekdays only".
Will this menu become active only on Saturday and Sunday? If yes, choose "weekends only".
Will this menu be active only on one particular day or a schedule that doesn't fit in the above categories? If yes, then choose "specific day" followed by the day.
Next, "Select the Menu to become active" is where you will choose the particular menu number that you are working on.
Lastly, "Select the time this Menu to become active" is where you input the start time of the menu. With the time selected, click the green "Add this even to weekly schedule >" button. Now click the blue "Save Changes" button and you are finished with adding this menu to the schedule.
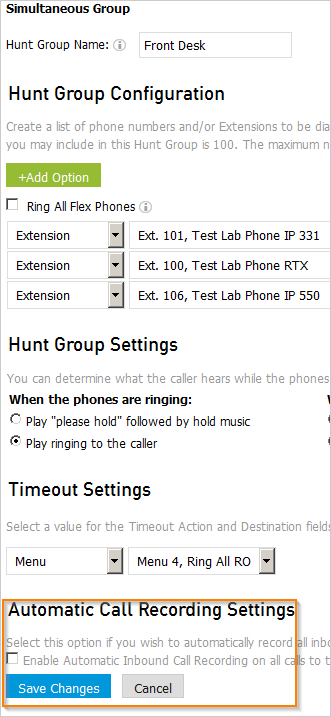
Hunt Groups
Hunt Groups are used to deliver calls to a select group of phones on your network and/or phones off your network (such as cell phones) at the same time or in an ordered manner
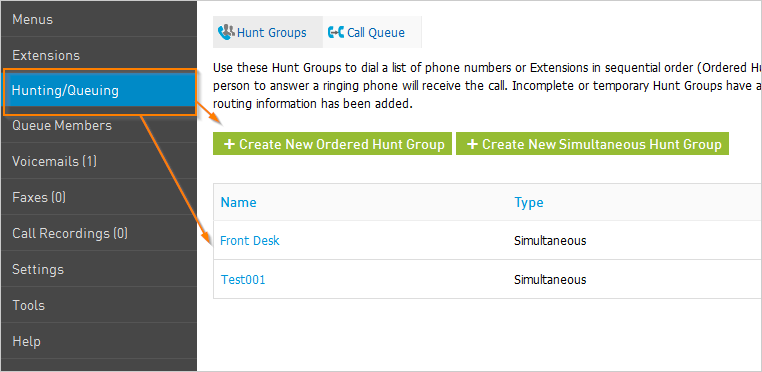
Accessing Hunt Groups
[click to expand]
When logged into your Auto Attendant:
Click the "Hunting/Queuing" tab on the left.
Now you have the options to:
"+Create New Ordered Hunt Group"
"+Create New Simultaneous Hunt Group"
Or, if you have already created a Hunt Group then you can view or edit it's settings by clicking on the name of the existing Hunt Group.
Ordered Hunt Group Settings
[click to expand]
Ordered Hunt Groups allow you to choose a group of phone numbers and/or extensions that will ring in an ordered manner for the selected number of rings.
Step 1: Hunt Group Name
[click to expand]
Hunt Group Name: When Intermedia phones that are part of a Hunt Group ring, the Hunt Group name will show up on the phone display. The Hunt Group name:
Cannot be longer than 12 characters.
Must start with a letter.
Can use 0-9 except for the first character.
Cannot use any non-alpha or numeric characters other than _.
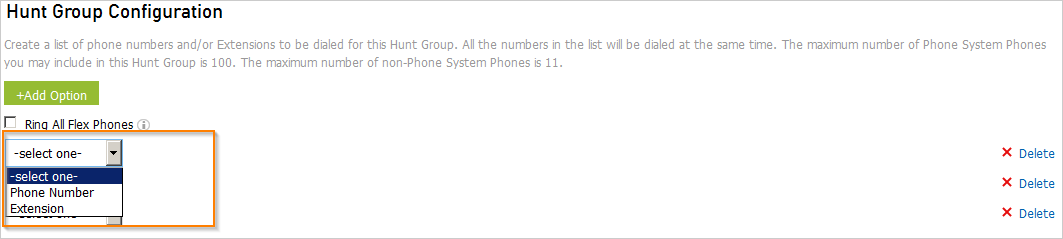
Step 2: Hunt Group Configuration
[click to expand]
Hunt Group Configuration: This section is where you will choose which extensions and/or phone numbers that you want included in the Hunt Group. Click the green "+Add Option" button to add another entry to the list. For each entry, choose one of the following:
Phone Number: A number that is not on your Intermedia account such as a cell phone or answering service. When entering the phone number, do not use hyphens or spaces (i.e. 8773570750).
Extension: One number that is on the account. Selecting this will prompt you to choose an extension from your Intermedia account which can include extensions assigned to the phones or virtual extensions created in the Auto Attendant (see the 'Extensions' tab to the left for more information on virtual extensions).
Next, choose the number of times that you want the phone to ring before moving on to the next phone in the list or to the "Timeout Settings".
Note: Make sure the number of rings chosen in the Hunt Group configuration are lower than that of the phone's time-out to voicemail setting. For example, if your cell phone takes 6 rings to go to voicemail then you would have the Hunt Group ring your cell 5 or less times to avoid going to it's voicemail.
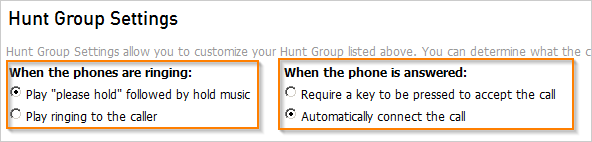
Step 3: Hunt Group Settings
[click to expand]
Hunt Group Settings: Once you have all the phones input in the configuration section, you'll now configure the following two options:
When the phones are ringing:
Play "please hold" followed by hold music: The caller will hear this instead of ringing.
Play ringing to the caller: The caller will hear ringing.
When the phone is answered:
Require a key to be pressed to accept the call: When you answer a Hunt Group call, a recording will state that you need to press a key on the phone to accept the call.
Note: This option is helpful if you are including a cell phone in the Hunt Group. When a cell phone is out of range or turned off it automatically will answer a call and take it to it's own voicemail. Choose this option to send the call to the next phone in the Hunt Group when the cell is off or does not have service.
Automatically connect the call: By default this is selected and will connect you to the caller as soon as you answer.
Step 4: Timeout Settings
[click to expand]
Timeout Settings: Select what should happen if none of the hunt group phones answer the call after the configured number of rings.
Choose a setting from the drop-down box below to get more information on that setting.
One number that is not on your Intermedia account such as a cell phone or answering service.
Selecting this will prompt you to enter a phone number, do not use hyphens or spaces (i.e. 8773570750).
One number that is on the account.
Selecting this will prompt you to choose an extension from your Intermedia account which can include extensions assigned to the phones or virtual extensions created in the Auto Attendant (see the 'Extensions' tab to the left for more information on virtual extensions)
Link to an already created menu or create a new menu. Then follow this tutorial to set up the linked menu. This option is commonly used if you have multiple departments that will require their own custom recording with separate key press options.
Bulletins hold a custom recording and can be used for informational purposes or for custom voicemail recordings. Bulletins used for key presses are commonly used for recordings giving hours, directions, or other commonly requested business information. Bulletins can also be used for custom voicemail recordings. For more information on bulletins, select the 'Bulletins' tab to the left.
Hunt Groups are a group of phones that ring in an ordered manner or all at the same time. This options is commonly used when there is a group of phones assigned to a specific department such as for setting an appointment or reaching the sales department. For more information on Hunt Groups, click the 'Hunt Groups' tab to the left.
Call Queues are advanced versions of hunt groups. Call Queues are commonly used in settings with high call volume where there will consistently be active calls. Using a call queue places the caller on hold from 1 minute up to 60 minutes until a phone becomes available. For much more detailed information on Call Queues and setting them up, click the 'Call Queues' link to the left.
This option will send calls straight to the voicemail on one of your Intermedia phones, the Auto Attendant voicemail, or a voicemail bulletin.
After the caller presses the assigned key, an automated recording (not configurable) will state "Please enter the extension number of the person you are calling followed by #". Please review the 'Extensions' tab to the left to find out more on enabling/disabling specific extensions that will be allowed in the Dial by Extension option.
Note: Dial by Extension can only be activated by a key press. Having a menu recording stating something along the lines of "If you know your party's extension please dial it now" will NOT work. The menu recording must state a specific key to be pressed to activate the dial by extension option.
After the caller presses the assigned key, an automated recording (not configurable) will state "Please enter the first few letters of the party's name followed by #. For 'Q' touch 7 for 'Z' touch 9". Please review the 'Extensions' tab to the left to find out more on enabling/disabling specific extensions that will be allowed in the Dial by First Name option.
After the caller presses the assigned key, an automated recording (not configurable) will state "Please enter the first few letters of the party's last followed by #. For 'Q' touch 7 for 'Z' touch 9". Please review the 'Extensions' tab to the left to find out more on enabling/disabling specific extensions that will be allowed in the Dial by Last Name option.
This will replay the menu recording. This is commonly used for longer recordings that use many key press options.
This will immediately disconnect the caller.
Step 5: Automatic Call Recording Settings
[click to expand]
Automatic Call Recording Settings:
Enabling Automatic Call Recording will record all inbound calls that are answered by this Hunt Group. For more information on Automatic Call Recording, choose the 'Call Recording' tab to the left.
Simultaneous Hunt Group Settings
[click to expand]
Simultaneous Hunt Groups allow you to choose a group of phone numbers and/or extensions that will ring in at the same time for a set number of rings.
Step 1: Hunt Group Name
[click to expand]
Hunt Group Name: When Intermedia phones that are part of a Hunt Group ring, the Hunt Group name will show up on the phone display. The Hunt Group name:
Cannot be longer than 12 characters.
Must start with a letter.
Can use 0-9 except for the first character.
Cannot use any non-alpha or numeric characters other than _.
Step 2: Hunt Group Configuration
[click to expand]
Hunt Group Configuration: This section is where you will choose which extensions and/or phone numbers that you want included in the Hunt Group. Click the green "+Add Option" button to add another entry to the list. For each entry, choose one of the following:
Phone Number: A number that is not on your Intermedia account such as a cell phone or answering service. When entering the phone number, do not use hyphens or spaces (i.e. 8773570750).
Extension: One number that is on the account. Selecting this will prompt you to choose an extension from your Intermedia account which can include extensions assigned to the phones or virtual extensions created in the Auto Attendant (see the 'Extensions' tab to the left for more information on virtual extensions).
Note: Make sure the number of rings chosen in the Hunt Group configuration are lower than that of the phone's time-out to voicemail setting. For example, if your cell phone takes 6 rings to go to voicemail then you would have the Hunt Group ring your cell 5 or less times to avoid going to it's voicemail.
Step 3: Hunt Group Settings
[click to expand]
Hunt Group Settings: Once you have all the phones input in the configuration section, you'll now configure the following two options:
When the phones are ringing:
Play "please hold" followed by hold music: The caller will hear this instead of ringing.
Play ringing to the caller: The caller will hear ringing.
When the phone is answered:
Require a key to be pressed to accept the call: When you answer a Hunt Group call, a recording will state that you need to press a key on the phone to accept the call.
Note: This option is helpful if you are including a cell phone in the Hunt Group. When a cell phone is out of range or turned off it automatically will answer a call and take it to it's own voicemail. Choose this option to send the call to the next phone in the Hunt Group when the cell is off or does not have service.
Automatically connect the call: By default this is selected and will connect you to the caller as soon as you answer.
Step 4: Timeout Settings
[click to expand]
Timeout Settings: Select the number of rings that the hunt group should ring and what should happen if none of the hunt group phones answer the call after the configured number of rings.
Note: Make sure the number of rings chosen in the Hunt Group configuration are lower than that of the phone's time-out to voicemail setting. For example, if your cell phone takes 6 rings to go to voicemail then you would have the Hunt Group ring your cell 5 or less times to avoid going to it's voicemail.
Next, choose a Timeout Action and Destination from the drop-down box below to get more information on that setting. This action will occur if the Hunt Group phones are not answered after the set number of rings.
One number that is not on your Intermedia account such as a cell phone or answering service.
Selecting this will prompt you to enter a phone number, do not use hyphens or spaces (i.e. 8773570750).
One number that is on the account.
Selecting this will prompt you to choose an extension from your Intermedia account which can include extensions assigned to the phones or virtual extensions created in the Auto Attendant (see the 'Extensions' tab to the left for more information on virtual extensions)
Link to an already created menu or create a new menu. Then follow this tutorial to set up the linked menu. This option is commonly used if you have multiple departments that will require their own custom recording with separate key press options.
Bulletins hold a custom recording and can be used for informational purposes or for custom voicemail recordings. Bulletins used for key presses are commonly used for recordings giving hours, directions, or other commonly requested business information. Bulletins can also be used for custom voicemail recordings. For more information on bulletins, select the 'Bulletins' tab to the left.
Hunt Groups are a group of phones that ring in an ordered manner or all at the same time. This options is commonly used when there is a group of phones assigned to a specific department such as for setting an appointment or reaching the sales department. For more information on Hunt Groups, click the 'Hunt Groups' tab to the left.
Call Queues are advanced versions of hunt groups. Call Queues are commonly used in settings with high call volume where there will consistently be active calls. Using a call queue places the caller on hold from 1 minute up to 60 minutes until a phone becomes available. For much more detailed information on Call Queues and setting them up, click the 'Call Queues' link to the left.
This option will send calls straight to the voicemail on one of your Intermedia phones, the Auto Attendant voicemail, or a voicemail bulletin.
After the caller presses the assigned key, an automated recording (not configurable) will state "Please enter the extension number of the person you are calling followed by #". Please review the 'Extensions' tab to the left to find out more on enabling/disabling specific extensions that will be allowed in the Dial by Extension option.
Note: Dial by Extension can only be activated by a key press. Having a menu recording stating something along the lines of "If you know your party's extension please dial it now" will NOT work. The menu recording must state a specific key to be pressed to activate the dial by extension option.
After the caller presses the assigned key, an automated recording (not configurable) will state "Please enter the first few letters of the party's name followed by #. For 'Q' touch 7 for 'Z' touch 9". Please review the 'Extensions' tab to the left to find out more on enabling/disabling specific extensions that will be allowed in the Dial by First Name option.
After the caller presses the assigned key, an automated recording (not configurable) will state "Please enter the first few letters of the party's last followed by #. For 'Q' touch 7 for 'Z' touch 9". Please review the 'Extensions' tab to the left to find out more on enabling/disabling specific extensions that will be allowed in the Dial by Last Name option.
This will replay the menu recording. This is commonly used for longer recordings that use many key press options.
This will immediately disconnect the caller.
Step 5: Automatic Call Recording Settings
[click to expand]
Automatic Call Recording Settings:
Enabling Automatic Call Recording will record all inbound calls that are answered by this Hunt Group. For more information on Automatic Call Recording, choose the 'Call Recording' tab to the left.
Bulletins
Bulletins provide the capability to play a custom informational recording or voicemail recording to callers. Expand the sections below for information on accessing, editing, and creating bulletins.
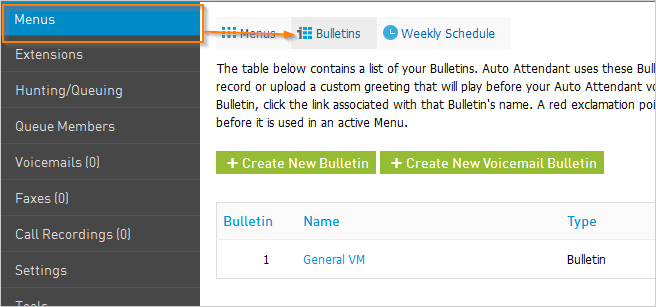
Accessing Bulletins
[click to expand]
To access the Bulletin settings:
Login to your Auto Attendant.
Click the 'Menus' tab on the left.
Click the 'Bulletins' tab.
If you have already created a bulletin and wish to view or edit it's settings, then below the creation options you will see a list of existing bulletins. Click the name of the existing bulletin to edit it.
The Bulletins page will also provide you with the options to "+Create New Bulletin" and "+Create New Voicemail Bulletin". For more information on these, expand the sections below
Create a New Bulletin
[click to expand]
This option lets you create a bulletin that can have a custom recording, limited key press options, and a custom timeout setting.
Step 1: Bulletin Name
[click to expand]
Bulletin Name: The Bulletin Name cannot be longer than 30 characters and can contain numbers, letters, and special characters.
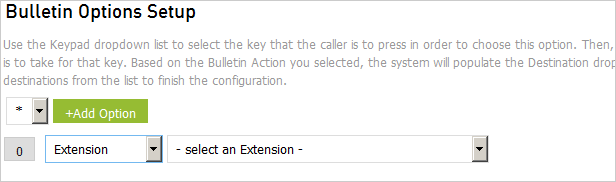
Step 2: Bulletin Options Setup
[click to expand]
Bulletins Option Setup: If your custom bulletin recording gives the caller an option to press a key, then use this section to add the key press and configure it. Bulletins only allow the use of 0, *, and # for key presses. See the drop down below for the more information on each key press option.
Bulletin key press options are commonly used to replay the bulletin recording, leave a VM, reach a receptionist, or ending the call.
One number that is not on your Intermedia account such as a cell phone or answering service.
Selecting this will prompt you to enter a phone number, do not use hyphens or spaces (i.e. 8773570750).
One number that is on the account.
Selecting this will prompt you to choose an extension from your Intermedia account which can include extensions assigned to the phones or virtual extensions created in the Auto Attendant (see the 'Extensions' tab to the left for more information on virtual extensions)
Link to an already created menu or create a new menu. Then follow this tutorial to set up the linked menu. This option is commonly used if you have multiple departments that will require their own custom recording with separate key press options.
Bulletins hold a custom recording and can be used for informational purposes or for custom voicemail recordings. Bulletins used for key presses are commonly used for recordings giving hours, directions, or other commonly requested business information. Bulletins can also be used for custom voicemail recordings. For more information on bulletins, select the 'Bulletins' tab to the left.
Hunt Groups are a group of phones that ring in an ordered manner or all at the same time. This options is commonly used when there is a group of phones assigned to a specific department such as for setting an appointment or reaching the sales department. For more information on Hunt Groups, click the 'Hunt Groups' tab to the left.
Call Queues are advanced versions of hunt groups. Call Queues are commonly used in settings with high call volume where there will consistently be active calls. Using a call queue places the caller on hold from 1 minute up to 60 minutes until a phone becomes available. For much more detailed information on Call Queues and setting them up, click the 'Call Queues' link to the left.
This option will send calls straight to the voicemail on one of your Intermedia phones, the Auto Attendant voicemail, or a voicemail bulletin.
This will replay the menu recording. This is commonly used for longer recordings that use many key press options.
This will immediately disconnect the caller.
Step 3: Timeout Settings
[click to expand]
Timeout Settings: This is where the call will end up if there was a custom bulletin recording with no key presses, a bulletin with no recording, or the caller didn't press anything during the bulletin recording.
When checked, the 'Replay Bulletin' check box replays the recording up to 9 times. You should only check this box if you have a recording and want it to replay more than once.
Next, the call will timeout to the option you choose in the "Timeout Settings" drop-down box. For more information on each of the options, review the drop-down box below.
One number that is not on your Intermedia account such as a cell phone or answering service.
Selecting this will prompt you to enter a phone number, do not use hyphens or spaces (i.e. 8773570750).
One number that is on the account.
Selecting this will prompt you to choose an extension from your Intermedia account which can include extensions assigned to the phones or virtual extensions created in the Auto Attendant (see the 'Extensions' tab to the left for more information on virtual extensions)
Link to an already created menu or create a new menu. Then follow this tutorial to set up the linked menu. This option is commonly used if you have multiple departments that will require their own custom recording with separate key press options.
Bulletins hold a custom recording and can be used for informational purposes or for custom voicemail recordings. Bulletins used for key presses are commonly used for recordings giving hours, directions, or other commonly requested business information. Bulletins can also be used for custom voicemail recordings. For more information on bulletins, select the 'Bulletins' tab to the left.
Hunt Groups are a group of phones that ring in an ordered manner or all at the same time. This options is commonly used when there is a group of phones assigned to a specific department such as for setting an appointment or reaching the sales department. For more information on Hunt Groups, click the 'Hunt Groups' tab to the left.
Call Queues are advanced versions of hunt groups. Call Queues are commonly used in settings with high call volume where there will consistently be active calls. Using a call queue places the caller on hold from 1 minute up to 60 minutes until a phone becomes available. For much more detailed information on Call Queues and setting them up, click the 'Call Queues' link to the left.
This option will send calls straight to the voicemail on one of your Intermedia phones, the Auto Attendant voicemail, or a voicemail bulletin.
This will immediately disconnect the caller.
Step 4: Greeting
[click to expand]
Greeting: This section is where you can upload a custom bulletin recording that was recorded to a sound file. The file type can be .wav or .mp3. Simply click on the "Browse..." button > locate the file on your computer > then click "Open". After clicking "Save Changes" at the bottom of the page, your greeting will be successfully uploaded to this particular bulletin.
Note: Uploading a sound file is not the only method to create a bulletin greeting. For full information on creating bulletin recordings click the tab to the left labeled: "Recording Greetings".
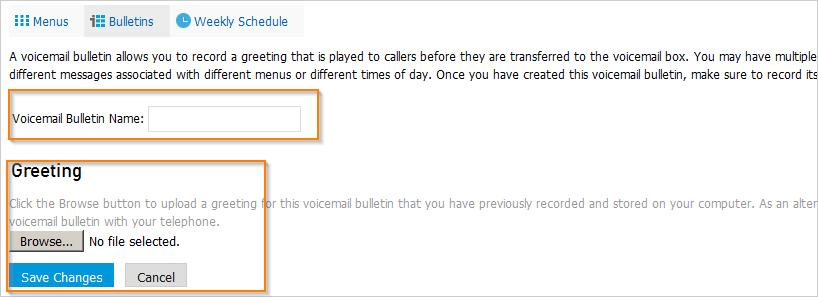
Create a New Voicemail Bulletin
[click to expand]
This option lets you create a Voicemail bulletin that can have a custom recording. You cannot choose key press options and the timeout cannot be changed from going to the Auto Attendant Voicemail.
Bulletin Name: The Bulletin Name cannot be longer than 30 characters and can contain numbers, letters, and special characters.
Greeting:
This section is where you can upload a custom menu recording that was recorded to a sound file. The file type can be .wav or .mp3. To upload a greeting:
Click the "Browse..." button.
Locate the file on your computer.
Highlight the file and click "Open".
The file will then upload. After clicking "Save Changes" at the bottom of the page, your greeting will be successfully uploaded to this particular menu"
Note: Uploading a sound file is not the only method to create a bulletin greeting. For full information on creating bulletin recordings click the tab to the left labeled: "Recording Greetings".
Recording Greetings
Within the Auto Attendant, custom recordings can only be attached to Menus and Bulletins. If you are looking for instructions on recording a voicemail greeting for a specific phone and not the Auto Attendant voicemail then please click here for further instructions
Once you have configured your Auto Attendant Menus and Bulletins, you'll want to attach a recording to them. There are two ways to accomplish this:
Upload a greeting: If you have the recording as a file on your computer or wish to create it then click here.
Uploading a sound file can be done in the 'Greeting' section at the bottom of the Menu and Bulletin configuration pages.
Access the menus or bulletins section.
Click on the name of the bulletin or menu that you want to upload a greeting to.
Scroll to the greeting section and click on the "Browse..." button
Find the sound file and then double-click it or highlight it and press the 'upload' button.
Custom Greeting and Voicemail files must have the following parameters when creating them:
.mp3:
Less than 100 megabytes in size.
Record using Constant Bit Rate (CBR).
.wav:
Less than 100 megabytes in size.
File should be recorded in 16-bit mono format.
Sample rate should be 11000 Hz or 8000 Hz.
If 8-bit mono must be used, then the file should be saved with a sample rate of 22,000 Hz.
Note: if you are having trouble uploading the audio file or if the quality is poor or distorted then one or more of the above parameters may be invalid.
Create a greeting via your phone:If you do not have a sound file then click here to create the recording using only your phone.
Menu Script Instructions: To find these instructions, login to your Auto Attendant > click on the 'Menus' tab, then click the 'Script' link to the far-right of the menu that you want to create the recording for. This will open a new browser window that will give you specific instructions on how to call into the Auto Attendant and create the recording.
Bulletin Script Instructions: To find these instructions, login to your Auto Attendant > click on the 'Menus' tab > click on the 'Bulletins' tab > then click on the 'Script' link to the far-right of the bulletin that you want to create the recording for. This will open a new browser window that will give you specific instructions on how to call into your Auto Attendant to create the recording.
Extensions
The extensions tab in the Auto Attendant provides a list of all extensions on the account. This includes extensions tied to physical phones and virtual extensions which are extensions used by the Auto Attendnant to associate names (for dial by name and dial by extension) with phone numbers that are external to your phone system.
Extension Information
[click to expand]
The table on the Extensions page will contain all the default extensions on your account that are tied to physical phones or softphones. It also will contain all virtual extensions. More information on virtual extensions can be found in the next section. Each extension will also have the following information:
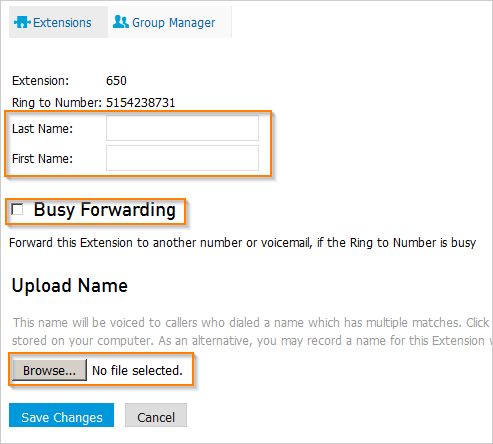
Extension: The assigned extension number.
Ring to Number: The number that is dialed when calls are transferred to this extension.
Last Name: Created within your Control Panel, the first name entered in this field will be the name used in a Dial by First Name directory for this extension.
First Name: Created within your Control Panel, the last name entered in this field will be the name used in a Dial by Last Name directory for this extension.
Dial By Name/Extension Checkbox: When checked, this particular extension will be reachable via:
Dial by Extension directories
Dial by First Name directories
Dial by Last Name directories
Virtual Extension Information
[click to expand]
Virtual Extensions are only accessible by the Auto Attendant. Creating virtual extensions allows you to assign an extension number to any phone numbers (i.e. your cell phone number) and then that extension can be accessed by callers via a Dial by Name or a Dial by Extension without them needing to know your private cell phone number.
Note: Virtual Extensions can NOT be accessed directly from a desk phone. For example, you create virtual extension number 400 that forwards calls to your cell phone. You cannot do the following:
CANNOTs with Virtual Extensions
You cannot pick up your desk phone and dial extension 400. It is only used by the auto attendant.
If you get a call on your desk phone, you cannot transfer the call to extension 400. The Virtual Extension is only accessible by the auto attendant.
The above two examples can be done with the Cloud SoftPhone service. Speak to your sales representative for more information.
However, you can do the following with a Virtual Extension:
CANs with Virtual Extensions.
Have a Dial by Extension directory allowing the caller to enter extension 400 and reach your cell phone without you having to give out your cell phone number.
Have a Hunt Group ring your desk phone extension and your Virtual Extension. This is useful if you are in and out of the office and do not want to miss a call.
Have a Dial by Name directory allowing the caller to enter your name, which is tied to your Virtual Extension, and the call gets transferred to your cell phone.
Creating a Virtual Extension
[click to expand]
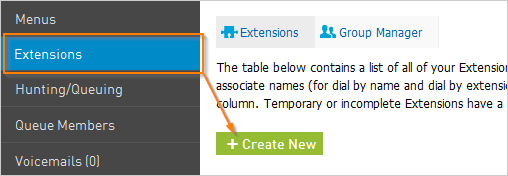
To create a Virtual Extension you'll first need to login to your Auto Attendant > click on the "Extensions" tab > then click on the green "+ Create New" button.
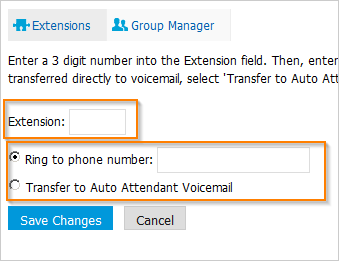
On the next screen, complete the following:
Extension: enter the 3 digit extension number that you would like assigned to the virtual extension.
Ring to phone number: input the 10-digit phone number for the phone you want to assign to this Virtual Extension.
Transfer to Auto Attendant Voicemail: instead of ringing a phone, this virtual extension will automatically send calls to the Auto Attendant Voicemail.
Next, you'll save your changes and be presented with more configuration options for your Virtual Extension:
Last Name and First Name: this is used in Dial by Name directories.
Busy Forwarding: check this box to forward calls elsewhere if your initial Ring to Number is busy. After enabling Busy Forwarding, you will choose the number of rings to the second number and then input the 10-digit phone number or have the call go directly to the Auto Attendant Voicemail if your initial Ring to Number is busy or unanswered.
Upload Name: if this Virtual Extension is going to be used in a Dial by Name directory, then you can upload the sound file containing the name for this Virtual Extension. For more information on creating sound files for the Auto Attendant, reivew the 'Recording Greetings' tab to the left.
Now, click the blue "Save Changes" button and the Virtual Extension will be saved and ready to use.
Call Queues
Call queues are generally used for offices with high amounts of call volumes. A call queue will send a call to an available phone or if no phones are available it will put the caller on hold until someone is available to take the call.
Call Queue Configuration can be broken up into 6 parts. Click each part below to expand it for more information:
Step 1: Members
[click to expand]
This section is where you will choose all the phones that will belong ring in this call queue. Only IP phones and SoftPhones can be members of a Call Queue. Virtual Extensions and off-network numbers such as a cell phone cannot be Call Queue members.
Step 2: Options
[click to expand]
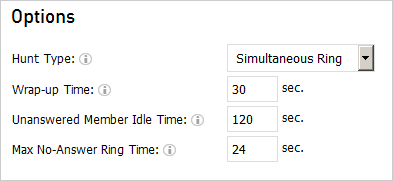
This section is used to determine the order phones will ring in if they are available and to configure when a phone is considered available.
Hunt Type: Choose a Hunt Type from the drop-down for more information.
Ascending: Rings the free member that is lowest in the group.
Least Recently Used: Rings the free member that has been the longest without a call.
Round Robin: Determines which member last had a call, and then rings the next free member(in the order as configured in the member list). When it gets to the bottom of the list it returns to the top and starts again.
Simultaneous Ring: A new inbound call will attempt to simultaneously ring all free members before placing the call into the queue.
Wrap-up Time (1-300 seconds): The amount of time after a call is completed before the call queue will send another call to the phone. This feature is commonly used to give the member to perform any 'wrap-up' activities related to the call, for example taking notes about the call.
Unanswered Member Idle Time(0 to 600 seconds): The period of time a member will be taken out of the call queue if they did not answer a call.
Max No-Answer Ring Time(1 to 60 seconds): The amount of time a member phone will ring before putting that member in Unanswered Member Idle Time.
Step 3: Recordings
[click to expand]
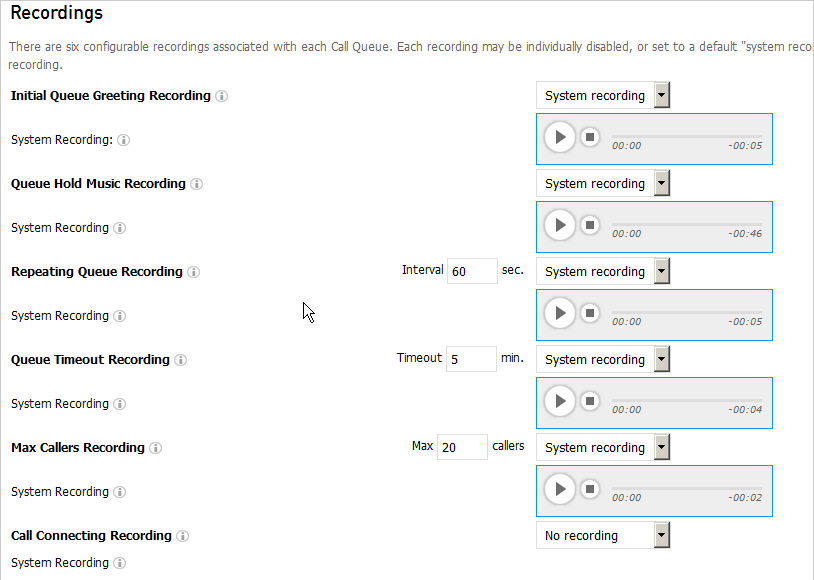
Call queue recordings must be uploaded. There is no option to call into our system and create a recording over the phone. See the "Recordings Greetings" section to the left for more information on file parameters.
Click to expand each section below to learn more about that specific recording.
Initial Queue Greeting Recording
[click to expand]
This recording plays when a new inbound call first enteres the queue and no members are available to take the call.
Default Recording: "All our representatives are busy, please remain on the line and yoru call will be answered in the order received."
Queue Hold Music Recording
[click to expand]
This recording plays while a caller is on hold in the queue. Typically, a music selection is used for this recording.
Default Recording: [standard hold music]
Repeating Queue Recording
[click to expand]
This recording plays at a defined interval (0-120 seconds) while a caller is on hold. If you would like the caller to have key press options while holding (for example, "if you would like to cease holding and leave a message, press '0' now") then a custom recording for the Repeating Queue Recording would be needed.
Default Recording: you call is important to us. Your call will be answered in the order received. Please continue to hold."
Queue Timeout Recording
[click to expand]
This recording is played after a defined amount of time (1-60 minutes) of no members answering the call.
Default Recording: "We have attempted to connect your call, however all representatives remain busy."
Max Callers Recording
[click to expand]
This recording is played to a caller when in entering into a call queue and the defined number of maximum callers(1-20 callers) has been reached. The call will then be sent to the Timeout Settings.
Default Recording: "All representatives are currently busy."
Call Connecting Recording
[click to expand]
This recording is played as a caller is being connected to a call queue member's phone. By default, it is disabled.
Default Recording: "We are connecting your call."
Step 4: Call Queue Keypad Options Setup
[click to expand]
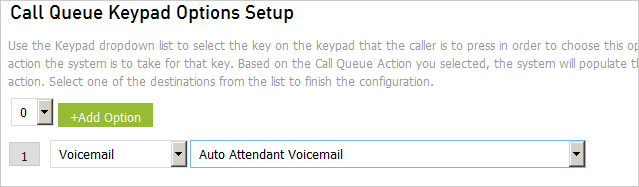
This section is used to define key presses that the caller can press while on hold in the call queue. Commonly, these key presses are announced in a custom Reapeating Queue Recording message. To add a Keypad Option, select a number from the drop-down list then the green "+Add Option" button. Then select the functionality for that keypress option. For more information on each option, select from the drop-down below:
One number that is not on your Intermedia accoutn such as a cell phone or answering service.
Selecting this will prompt you to enter a phone number, do not use hyphens or spaces (i.e. 8773570750).
One number that is on the account.
Selecting this will prompt you to choose an extension from your Intermedia account which can include extensions assigned to the phones or virtual extensions created in the Auto Attendant (see the 'Extensions' tab to the left for more information on virtual extensions)
Link to an already created menu or create a new menu. Then follow this tutorial to set up the linked menu. This option is commonly used if you have multiple departments that will require their own custom recording with separate key press options.
Bulletins hold a custom recording and can be used for informational purposes or for custom voicemail recordings. Bulletins used for key presses are commonly used for recordings giving hours, directions, or other commonly requested business information. Bulletins can also be used for custom voicemail recordings. For more information on bulletins, select the 'Bulletins' tab to the left.
Hunt Groups are a group of phones that ring in an ordered manner or all at the same time. This options is commonly used when there is a group of phones assigned to a specific department such as for setting an appointment or reaching the sales department. For more information on Hunt Groups, click the 'Hunt Groups' tab to the left.
Call Queues are advanced versions of hunt groups. Call Queues are commonly used in settings with high call volume where there will consistently be active calls. Using a call queue places the caller on hold from 1 minute up to 60 minutes until a phone becomes available. For much more detailed information on Call Queues and setting them up, click the 'Call Queues' link to the left.
This option will send calls straight to the voicemail on one of your Intermedia phones, the Auto Attendant voicemail, or a voicemail bulletin.
This option will replay the Repeating Call Queue Recording.
This will immediately disconnect the caller.
Step 5: Timeout Settings
[click to expand]
The Timeout Setting action is what will occur if the call has not been answered by a member for the period of timed specified in the Queue Timeout field. For more information on the timeout options available, select from the drop-down box below:
One number that is not on your Intermedia accoutn such as a cell phone or answering service.
Selecting this will prompt you to enter a phone number, do not use hyphens or spaces (i.e. 8773570750).
One number that is on the account.
Selecting this will prompt you to choose an extension from your Intermedia account which can include extensions assigned to the phones or virtual extensions created in the Auto Attendant (see the 'Extensions' tab to the left for more information on virtual extensions)
Link to an already created menu or create a new menu. Then follow this tutorial to set up the linked menu. This option is commonly used if you have multiple departments that will require their own custom recording with separate key press options.
Bulletins hold a custom recording and can be used for informational purposes or for custom voicemail recordings. Bulletins used for key presses are commonly used for recordings giving hours, directions, or other commonly requested business information. Bulletins can also be used for custom voicemail recordings. For more information on bulletins, select the 'Bulletins' tab to the left.
Hunt Groups are a group of phones that ring in an ordered manner or all at the same time. This options is commonly used when there is a group of phones assigned to a specific department such as for setting an appointment or reaching the sales department. For more information on Hunt Groups, click the 'Hunt Groups' tab to the left.
Call Queues are advanced versions of hunt groups. Call Queues are commonly used in settings with high call volume where there will consistently be active calls. Using a call queue places the caller on hold from 1 minute up to 60 minutes until a phone becomes available. For much more detailed information on Call Queues and setting them up, click the 'Call Queues' link to the left.
This option will send calls straight to the voicemail on one of your Intermedia phones, the Auto Attendant voicemail, or a voicemail bulletin.
This option will replay the Repeating Call Queue Recording.
This will immediately disconnect the caller.
Step 6: Automatic Call Recording Settings
[click to expand]
If you have automatic call recording enabled globally and would like all calls to be automatically recorded when answered in this call queue, then check this box to Enable Automatic Call Recording. For more information on call recording and enabling it globally, click the 'Call Recording' tab to the left.
Call Queue Video Tutorial
[click to expand]
Call Recording
The Call Recording section in the Auto Attendant is where recorded calls are stored. From this list of recordings you will be able to delete, listen, download, and forward the recordings.
To enable Call Recording you must first enable it globally and then enable it within your Hunt Group or Call Queue. Click the below options for instructions on these steps:
1. Enable Call Recording globally
[click to expand]
To enable Call Recording:
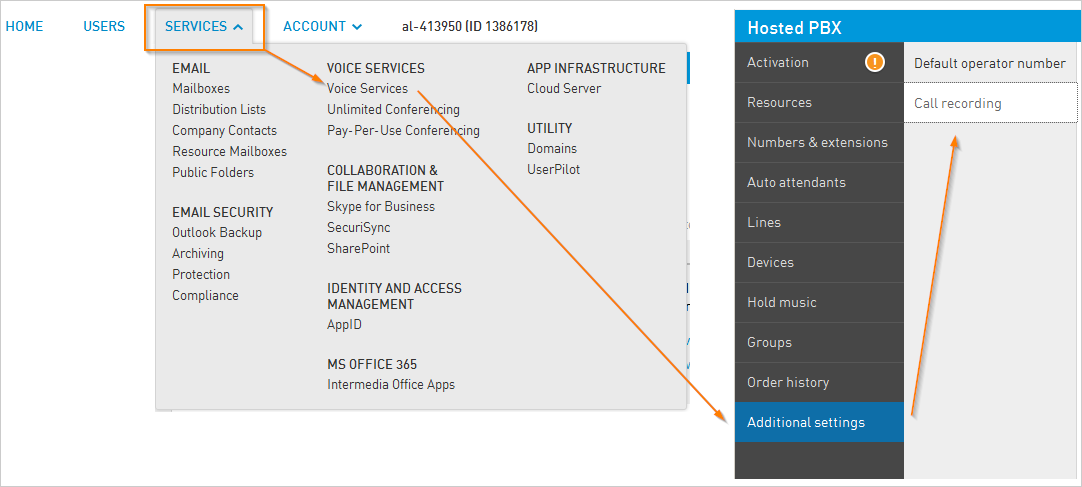
Login to your HostPilot Control Panel.
Click on Services then Voice Services
Go to the 'Additional settings' tab.
Click the 'Call recording' tab.
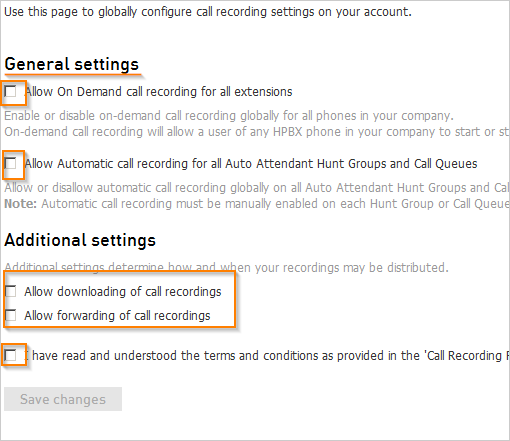
Now that your logged in you'll see the call recording page as pictured here:
General Settings: Here, you can enable/disable:
On Demand recording: Globally allow all phones to manually start recording an active call.
Automatic recording: Globally record calls on all Hunt Groups and Call Queues in the Auto Attendant.
Note: Automatic call recording must be manually enabled on each Hunt Group and Call Queue.
Additional Settings: This section allows you to choose if you want to allow downloading and forwarding of call recordings. Last of all you will need to read the terms and conditions and check the box once completed and save your changes.
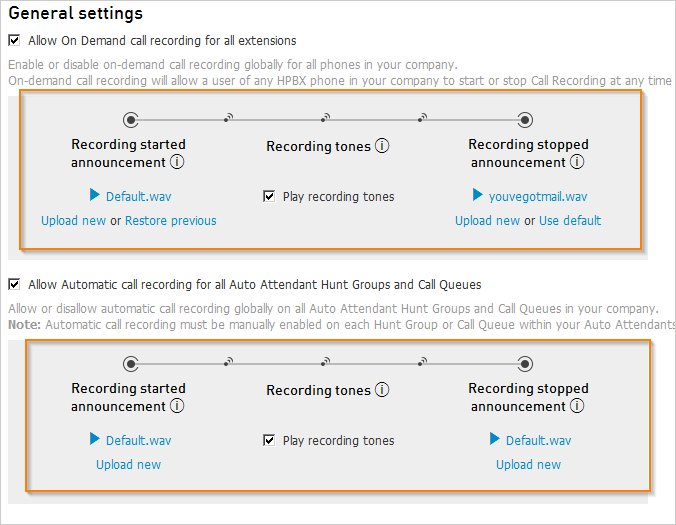
Once you have enabled and accepted the call recording terms and conditions, you'll be presented with the following configuration options:
Recording started announcement: Choose to play the current recording, upload a new recording, or use the default recording("This call is being recorded").
Recording tones: Enable or disable a tone played to all participants of a call to indicate a recording is active.
Recording stopped announcement: Choose to play the current recording, upload a new recording, or use the default recording("Recording has stopped").
2. Enable Call Recording in your Hunt Group or Call Queue
[click to expand]
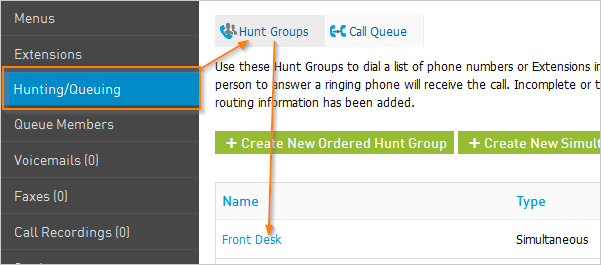
To enable automatic call recording on a Hunt Group or Call Queue:
Login to your Auto Attendant.
Click the "Hunting/Queuing" tab.
Open one of your existing Hunt Groups or Call Queues.
At the bottom of the configuration page, check the "Enable Automatic Call Recording" check box and then save your changes.